
Today is the day of unhelpful post lines. This particular post is about creating a new project from the void – where there was nothing, adding some content and then interacting with the feature that we have created.
I am in the process of determining if I can remove one of our modifications, known as the Vessel Modification – this series of posts will demonstrate the steps and the logic that I go through in order to a). the SDK is an appropriate tool for this and b). prove that various functionality I need in the Vessel Modification can be duplicated.
You’ll note that in this post I am creating some pretty useless code – but this is all about discovery and proof – don’t consider it polished or finished. Design of a coherent solution will come later. For those that don’t have the SDK, it shows how over a period of an hour or so you can install, create and run your own code.
I’m going to assume that you have had a good skim through the Developer Guide and read http://lawsonsmartoffice.com/2013/02/04/getting-started-with-the-smart-office-sdk/ some of what I am posting has already been covered on the lawsonsmartoffice.com blog.
As mentioned in part 1 (https://potatoit.wordpress.com/2013/02/24/smart-office-sdk-first-project-part-1-testing-the-installation/) , the format of this sequence of posts is to illustrate how I have explored using the SDK. I will be the first to admit I haven’t read the Developers Guide from start to finish – the chances are I never will; reference it, certainly 🙂
The first thing that we need to do is create a new project in Visual Studio. Under the Installed Templates, selecting the Visual C# root and you should see a couple of Lawson Smart Office templates. We need to select the Lawson Smart Office Client. We will be adding a feature to the project, the feature being our code.

I’m going to call the project LSOTest
We’ll now add our feature project. Right click on the solution and select Add -> New Project

We will add a “Lawson Smart Office Feature” and I am going to call it “MyInitialTest”.
Now let us run it and see what we have. We have to log in and then we get to the base canvas.
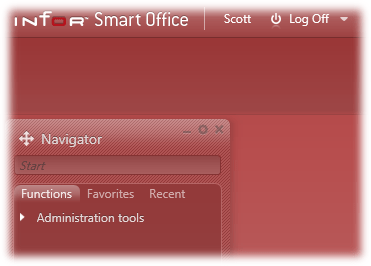
Notice that we have something missing from the Navigator – M3 Transactions 😦
If during our development or testing we want to launch M3 programs we need to add the mforms assembly to our client project (LSOTest). Right click on the References and select “Add Reference” browse to your SDK directory (or you can type in the %LSOSDKBin% that you set in the SDK installation steps

Which should take you directly to your LSO SDKs bin directory.
In it we have our mforms.dll assembly, double click on it and then click Add and finally close.
Under the LSOTest I now have a new entry under the references which says MForms

Now run the application.

Navigator now has M3 Transactions and we can actually run normal M3 programs.
We also need to add a reference back to our MyInitialTest project. Again, Right click on the References, select Add Reference -> Projects -> Solution and select “MyInitialTest”
The next thing that I want to be able to do is be able to launch MyIntialTest. And I want the URI prefix to be sac – so I would run my program by typing sac://MyInitialTest
To do this, in my solution I go down to the MyInitialTest project and open up the MyInitialTest.manifest file

I am interesting in changing the Applications “scheme”.
	<Application
		scheme="tempscheme"
		applicationGroup="SmartClient"
		assemblyName="MyInitialTest"
		factoryClass="MyInitialTest.MyInitialTestApplication"
		/>
You can see that we have a scheme of tempscheme. I will change that to sac
	<Application
		scheme="sac"
		applicationGroup="SmartClient"
		assemblyName="MyInitialTest"
		factoryClass="MyInitialTest.MyInitialTestApplication"
		/>
I then run my solution and in the Navigator I type sac://myinitialtest and I get

Pretty nifty really!
If we take a look at the code itself, we will see that the template has created the MyInitialTestApplication.cs with code that gives us a really good start on doing something useful.
Now because I am looking at proving that I can achieve certain base goals at the moment, I’m not really interested in aesthetics – I just want to prove a few things before things before I go about design considerations. So, with that in mind, we will dump some controls in to our example.
So, I’m going to add a user control – under the MyInitialTest I’ll right click and select Add New Item and I’ll go down to WPF -> User Control. I’m just going to leave the name as is (UserControl1.xaml)

<Button Content="Button" Height="23" HorizontalAlignment="Left" Margin="45,40,0,0" Name="button1" VerticalAlignment="Top" Width="75" />
<TextBox Height="23" HorizontalAlignment="Left" Margin="10,10,0,0" Name="textBox1" VerticalAlignment="Top" Width="120" />
Now I shall actually change the code which will add my newly created control to the window under the MyInitialTestApplication.cs LaunchTask() function. This will add my control to a StackPanel, and it will also add the templates code which does displays the “MyInitialTest”.
StackPanel spStackPanel = new StackPanel();

spStackPanel.Orientation = Orientation.Vertical;
spStackPanel.Children.Add(new UserControl1());

spStackPanel.Children.Add(content);

host.HostContent = spStackPanel;
And we shall run the application and load up my feature.

We don’t have any events created yet so not a lot will happen.
So we will now add an event, we want to make.
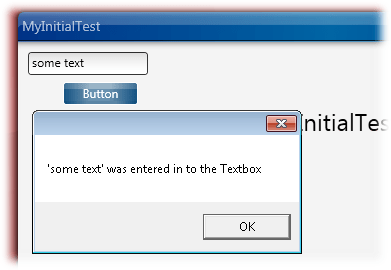
If we go to the XAML of my UserControl1.xaml and against the button I am going to add a handler for the Click event, it will create a button1_Click handler for me and also add the code for the handler to the UserControl1.cs
<Button Content="Button" Height="23" HorizontalAlignment="Left" Margin="45,40,0,0" Name="button1" VerticalAlignment="Top" Width="75" Click="button1_Click" />
And UserControl1.cs event and a call to display a MessageBox with the text in the TextBox
private void button1_Click(object sender, RoutedEventArgs e)
{
 MessageBox.Show("'" + textBox1.Text + "' was entered in to the Textbox");
}
A quick run and we can see everything is working according to plan.
Don’t forget that Smart Office provides its own range of ‘MessageBox’es – they should be what is used when you are deploying your solution. MessageBox.Show() is just a lot easier to remember 😉
We’ve now shown we can add our own controls and event handler.
Can we do something actually useful now? Let us launch a program based on what is entered in to our TextBox if it is prefixed by mforms://
This requires us to add the assemblies to our UserControl1.cs file and then calling LaunchTask.
Assemblies added
using Mango.Services;
using Mango.UI;
using Mango.UI.Core;
using Mango.UI.Services;
using Mango.UI.Services.Mashup;

private void button1_Click(object sender, RoutedEventArgs e)
{
 MessageBox.Show("You clicked a button and the text in the textbox was" + Environment.NewLine + textBox1.Text);

 if (textBox1.Text.StartsWith("mforms://") == true)
 {
  DashboardTaskService.Current.LaunchTask(new Uri(textBox1.Text));
 }
}
We run our solution and type mforms://mms001 in to our TextBox and hit enter, we then have success.

So, from the perspective of my Vessel Modification I have access to what appears to be almost all of the M3 functionality I need. I know through APIs and WebServices (wrapped SQL queries) that I can extract and update the information that I need for the Vessel Modification.
On the basis of what I have discovered so far, the SDK is a good fit for what I am hoping to achieve. The really nice thing being that I can write my applications data back to the same tables as the real vessel modification – meaning that my existing reports and processes won’t need any modification.
In the next post we will start having a good look at the actual solution to replacing the modification itself.
For those of you that use JScripts – the help files associated with the SDK are very helpful. I spent many many hours writing code to search for and validate assumptions I had made. It’s very useful indeed! 🙂

Hi.
Can you helpe me please.
The version of LSO i’am running is 10.2.1.037. I loaded the Infor Smart Office SDK – M3 10.2.
I followed all steps and I run successflly Samples.sln and I can debug the solution.
My problem is that I can’t see forms in the designer : “Invalid markup”
If I add a usercontrol and add some controls I can see them without any problem. But, for exemple in DesignSystemSample I can’t see the controls of
ControlSamplePanel.xaml.
In XAML I have errors :
For exemple :
the name “DesignSystemWindow” does not exist in the namespace “clr-namespace:Mango.DesignSystem;assembly=DesignSystem”
the name “ThemeIconButton” does not exist in the namespace “clr-namespace:Mango.DesignSystem;assembly=DesignSystem”
the name “ThemeIconButton” does not exist in the namespace “clr-namespace:Mango.DesignSystem;assembly=DesignSystem”
…
I added reference to all dll in the bin directory without any result
Thank you,
Salem
Does it compile and work?
If so, then you can add a resource dictionary to your user control so you can see the the Smart Office controls and see the formatting as it would be displayed in Smart Office.
When you have finished adjusting the formatting of the xaml, I comment out:
The errors will return and the formatting will look bad, but it will compile.
This way, your application will load the default theme of Smart Office, rather than the explicit style we set. This is quite noticeable with ThemeIconButtons
If your code doesn’t compile with these errors then you probably have a syntax error in your xaml or potentially missing an assembly declaration in the xaml
Cheers,
Scott
Sorry, I couldn’t post the xaml in the comments – lets try that again…
<UserControl.Resources>
<ResourceDictionary>
<ResourceDictionary.MergedDictionaries>
<ResourceDictionary Source=”/Mango.Skin;Component/Resources/FrogPond/FrogPondStyle.xaml” />
</ResourceDictionary.MergedDictionaries>
</ResourceDictionary>
</UserControl.Resources>
And I would comment out this line
<ResourceDictionary Source=”/Mango.Skin;Component/Resources/FrogPond/FrogPondStyle.xaml” />
and compile before deploying.
Thank you Scott.
I added the xaml and i deleted the directorie \AppData\Local\Microsoft\VisualStudio\12.0\Designer\ShadowCache (https://potatoit.kiwi/2015/03/25/unresolvable-xaml-references/).
It work, thank you 🙂
Bonjour,
I am trying to fun SQL quey within SDK form. I read the SDK documentation but didn’t found M3ip or severName. Are they simple ways to run get data using SQL without writing user and password in the connection string (any method will help).
Thank you
Hi Salem,
you shouldn’t query the database directly. You should use MWS to wrap select statements in webservices.
In the Smart Office profile there is a setting that you can retrieve which should be populated with the WebService address – though few installers seem to. (the Smart Office SDK documentation has a section on retrieving values from the Smart Office profile).
FWIW: when I need to store configuration settings for scripts, I will typically store them in a xml file on a webserver – usually under a directory I create beneath the mne directory as we can retrieve the MNE runtime URL from the profile – however given that the data that has traditionally been stored in the mne directory is getting moved in to a database it’s probably not the best long term choice.
The SDK mentions other methods of storing application settings, though I haven’t pursued it due to a caveat in the documentation that it was likely to change.
Cheers,
Scott
Hi and thanks for this useful post.
I’m following your steps but, in the beginning, after I’ve added both client and feature projects, when trying to launch the application and get the base canvas displayed, a message to relaunch application is always shown and, after that, the splash screen with “bouncing balls” rests without opening anything.
Could you help me, please?
Thanks,
JL
HI JL
You need to install the Microsoft SQL server Compact 3.5 sp1
https://www.microsoft.com/en-us/download/details.aspx?id=5821
But i guess you figured this out as your post is from may 🙂
regards Jesper